
雨之庭采用WordPress建站,并使用主题非常精致美观的Argon主题(在此感谢solstice23的开源),但是,我自己对一些设计进行了修改,这篇文章来记录主题的“文章卡片”修改。
Argon主题默认在建站的主页就是展示最新发布的前十篇文章,这些文章会以卡片的形式,经站长的设定,也就是单栏、双栏等形式展示出来。我当初觉得这个比较好看,于是就希望在其他的页面板块也能够有这个东西,这一时刻,就是我大规模接触PHP语言的开端了。
1 复制主页功能
1.1 导语与文章查询
我翻开了WordPress的主题页面编辑器,查看Argon主题的首页模板index.php,找到了查询文章的代码:
	<?php if ( have_posts() ) : ?>
		<?php
			while ( have_posts() ) :
				the_post();
				if (get_post_type() == 'shuoshuo'){
					get_template_part( 'template-parts/content-shuoshuo-preview' );
				}else{
					get_template_part( 'template-parts/content-preview', get_option('argon_article_list_layout', '1'));
				}
			endwhile;
		?>
		<?php
			echo get_argon_formatted_paginate_links_for_all_platforms();
		?>
		<?php
	endif;
	?>
如果能够把这个代码搬到别的页面模板,那么这个页面也必然会出现一样的最新前十篇文章卡片……吗?就拿雨城广场板块为例吧,我把WordPress自带的归档时间轴模板复制了一份,改成雨城广场的模板,这个模板主要分为两部分,首先是“导语”,就是对雨城广场简要介绍的内容(“博客不仅仅是一个人的平台……”这一块),导语结束后就是文章卡片,最初是写成这样子的:
<?php
/*
Template Name: 雨城广场页面模板
*/
?>

<?php get_header(); ?>

<div class="page-information-card-container"></div>

<?php get_sidebar(); ?>


<div id="primary" class="content-area">
    <!-- 1️⃣ 按照主题默认样式显示古腾堡编辑器里编辑的页面内容 -->
 <div class="entry-content page-content">
     <?php
			// 使用主题自带的 page 内容模板(自动包含标题、内容、所有样式)
			get_template_part( 'template-parts/content', 'page' );
	?>
</div>
<!-- 2️⃣ 显示最新文章列表(类似首页样式) -->
	<main id="main" class="site-main" role="main">

	<?php if ( have_posts() ) : ?>
		<?php
			while ( have_posts() ) :
				the_post();
				if (get_post_type() == 'shuoshuo'){
					get_template_part( 'template-parts/content-shuoshuo-preview' );
				}else{
					get_template_part( 'template-parts/content-preview', get_option('argon_article_list_layout', '1'));
				}
			endwhile;
		?>
		<?php
			echo get_argon_formatted_paginate_links_for_all_platforms();
		?>
		<?php
	endif;
	?>
	</main>
	</div>
	<?php get_footer(); ?>
第二部分我是直接复制了,但是最后发现什么都没有显示,感谢AI环节来了,ds是这么说的:
问题主要出在 WordPress 的主循环(Main Query) 上。当你把首页(index.php 或 home.php)的代码原封不动地复制到页面模板中时,have_posts() 查询的并不是所有文章,而是当前这个「页面」本身。
按我的理解,只有首页才能通过这串代码去查询到文章,单独的一个非首页的页面时无法查询的,那么就需要给这个页面独立写一个文章查询的逻辑:
<!-- 2️⃣ 显示最新文章列表(类似首页样式) -->
<div id="primary" class="content-area">
	<main id="main" class="site-main article-list article-list-home" role="main">

	<?php
	// 自定义查询:获取最新的文章(不包括当前页面)
	$args = array(
		'post_type'      => array('post', 'shuoshuo'), // 同时显示普通文章和“说说”
		'posts_per_page' => 10,                         // 每页显示数量,可改成 -1 显示全部
		'paged'          => get_query_var('paged') ? get_query_var('paged') : 1,
		'post__not_in'   => array( get_the_ID() ),      // 排除当前页面自身(避免重复)
	);
	$custom_query = new WP_Query( $args );

	if ( $custom_query->have_posts() ) :
		while ( $custom_query->have_posts() ) :
			$custom_query->the_post();

			if ( get_post_type() == 'shuoshuo' ) {
				get_template_part( 'template-parts/content-shuoshuo-preview' );
			} else {
				get_template_part( 'template-parts/content-preview', get_option('argon_article_list_layout', '1') );
			}
		endwhile;

		// 分页导航(适配自定义查询)
		echo paginate_links( array(
			'total'   => $custom_query->max_num_pages,
			'current' => max( 1, get_query_var('paged') ),
			'format'  => '?paged=%#%',
		) );

	else :
		echo '<p>还没有文章,稍后再来看看吧!</p>';
	endif;

	wp_reset_postdata(); // 重置查询,避免影响侧边栏等其他地方
	?>
AI分析是这样的,经过这样子修改后,确实就出现文章卡片了:
| 原来的首页模板 | 修正后的页面模板 |
|---|---|
have_posts() 主循环 = 当前页面的数据 | 第一个循环用 the_content() 输出你编辑的页面内容 |
没有 the_content(),所以古腾堡内容不显示(这个是导语部分,与文章查询无关) | 然后新建 WP_Query 单独获取所有文章(或指定类型) |
| 主循环里拿不到文章,所以没有列表 | 用 get_template_part() 复用主题自带的预览样式,和首页一样 |
| 无法分页(分页是针对首页文章流的) | 自定义查询时带上 paged 参数,分页也能正常工作 |
那么接下来就要解决查询指定分类的文章,WordPress给每一个分类(category)都赋予了一个数字id,因此只需要在查询代码中加上一行指定id就行了:
<?php
// 自定义查询:只获取特定分类(例如 ID 为 5)下的最新文章
$args = array(
    'cat'            => 5, // ✅ 重点:只显示分类ID为5的文章
    'post_type'      => array('post', 'shuoshuo'),
    'posts_per_page' => 10,
    'paged'          => $paged,
    'post__not_in'   => array( get_the_ID() ),
);
$custom_query = new WP_Query( $args );
// ... 后续的循环代码保持不变
?>
1.2 卡片布局
现在再解决文章卡片的布局问题,经过1.1的处理,现在的文章卡片都是以单栏的形式呈现,我个人感觉文章多起来的话还是双栏更好看,因此,最方便的办法应该就是给这个页面加css了,继续交给AI了,AI给了一个two-column-card-list系列的css:
/* 双栏卡片网格 */
.two-column-card-list .site-main {
    display: grid;
    grid-template-columns: repeat(2, 1fr);
    gap: 24px;
}

/* 确保每个卡片占满网格区域,并保持原有样式 */
.two-column-card-list .post-card,
.two-column-card-list article {
    width: 100%;
    margin: 0;
    height: auto;
}

/* 手机端自动变回单栏 */
@media (max-width: 768px) {
    .two-column-card-list .site-main {
        grid-template-columns: 1fr;
        gap: 20px;
    }
}
在雨城广场页面模板的PHP文件里的文章查询部分套上div标签,启用这个css:
<div class="two-column-card-list">
    <main id="main" class="site-main" role="main">
        <?php
        // 自定义查询保持不变...
        ?>
    </main>
</div>
这样子就有双栏布局了,不过还是会和首页不同的,首页会根据文章标题图片的分辨率不同,每一个文章卡片的高度不一定相同,但是我们的css里面高度是auto,但是当我不配图时,不配图的文章依然会和有图片的文章同高,这是我目前搞不懂的问题了,暂且不管,保留了,毕竟现在的效果已经很好了。
2 查询分页优化
最近我试了一下塞了十几篇文章,发现分页效果不是很好,因为我们的主题超链接配的是粉色,与网站背景图高度混合,所以我就为页面选择继续添加css:
/* 分页容器:居中对齐、留白 */
.custom-pagination {
    text-align: center;
    margin: 40px 0 20px;
    font-size: 0;  /* 消除 inline-block 间隙 */
}

/* 每个分页项(包括页码、上一页/下一页) */
.custom-pagination .page-numbers {
    display: inline-block;
    font-size: 16px;
    padding: 8px 14px;
    margin: 0 4px;
    background: #f5f5f5;
    color: #333;
    border-radius: 4px;
    text-decoration: none;
    transition: all 0.2s ease;
    border: 1px solid #e0e0e0;
    font-weight: normal;
}

/* 当前页(高亮醒目) */
.custom-pagination .page-numbers.current {
    background: #0073aa;   /* Argon 主色调可自行修改 */
    border-color: #0073aa;
    color: #fff;
    font-weight: bold;
    box-shadow: 0 2px 6px rgba(0,115,170,0.3);
}

/* 上一页 / 下一页 按钮 */
.custom-pagination .page-numbers.prev,
.custom-pagination .page-numbers.next {
    background: #ffffff;
    border-color: #cccccc;
    font-weight: 500;
    padding: 8px 18px;
}

/* 悬停效果 */
.custom-pagination a.page-numbers:hover {
    background: #0073aa;
    color: #fff;
    border-color: #0073aa;
    transform: translateY(-2px);
    box-shadow: 0 4px 8px rgba(0,0,0,0.1);
}

/* 禁用状态(如没有下一页时显示的span) */
.custom-pagination .page-numbers.dots {
    background: transparent;
    border-color: transparent;
    cursor: default;
}
然后在PHP分页函数加上上面的css标签:在 echo paginate_links(…); 外面包裹一个 <div class=”custom-pagination”>,并调整 prev_text / next_text 参数,让按钮更易于点击和识别。
// 分页导航(自定义样式)
echo '<div class="custom-pagination">';
echo paginate_links( array(
    'total'        => $custom_query->max_num_pages,
    'current'      => max( 1, get_query_var('paged') ),
    'format'       => '?paged=%#%',
    'prev_text'    => '← 上一页',   // 可改用图标,例如 '←' 或 Font Awesome 的 '<i class="fa fa-chevron-left"></i> 上一页'
    'next_text'    => '下一页 →',
    'mid_size'     => 2,            // 当前页左右显示几个页码
    'end_size'     => 1,            // 两端显示几个页码
    'type'         => 'plain',      // 保证输出HTML是a/span,再由CSS统一样式
) );
echo '</div>';
完成后效果是这样的:
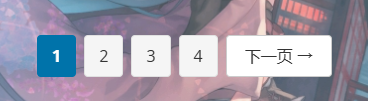
我也验证过了,页面变多之后,数字中间会出现……省略号的,这个问题也就解决了。
不过本人摆烂没有进一步弄了,就是如果文章未来变得很多,页面也很多,用户想要自定义输入页码进行跳转能否实现呢?当然可以,不过,雨之庭应该不需要那个东西吧……
所以,就到这里吧,那个功能没必要做了。